


How to Manage QEMU Virtual Machines from the Terminal with nEMU
nEMU, is an ncurses-based terminal UI (TUI) for QEMU, the awesomely versatile cross-platform hypervisor and ISA emulator. Think of nEMU as a complement to virt-manager.
Note: This guide covers the ncurses-based TUI nEMU. It is distinct from the Intel virtualization project also known as NEMU.
TL;DR
- nEMU provides a simple terminal UI for managing QEMU virtual machines.
- Install nEMU easily using Flox environments.
- Flox creates isolated environments for running nEMU and VM dependencies.
- nEMU simplifies creating, configuring, and managing VMs from the terminal.
- Import existing VMs or create new ones with nEMU.
Why use a TUI for QEMU management
When you’re already working in the terminal, switching to a graphical interface just to manage a VM can feel unnecessarily heavy. A TUI keeps everything in the same workflow you’re already using, and because it’s driven entirely by the keyboard, actions like launching, stopping, or inspecting a VM are often faster than clicking through layers of menus in a GUI. It’s a more natural fit for developers who value speed, focus, and minimal context switching.
A terminal‑based interface also pays off when you’re managing VMs on remote or headless machines. Instead of forwarding X11 or relying on a full desktop session over SSH, a lightweight TUI works anywhere your terminal does. This makes remote QEMU management far more reliable, especially in environments where you don’t have graphical support or simply don’t want the overhead.
Installing nEMU and QEMU via Flox
If you use VMs on Linux or macOS, you might be partial to QEMU. Sometimes, however, QEMU can be frustrating. QEMU’s trademark configurability and its staggering array of command-line options is a double-edged sword, especially when working with advanced configurations.
nEMU might not help you with the GPU passthrough thing, nor with the most esoteric of QEMU use cases, but it does make it a cinch to create, configure, monitor, manage, and (just as important) change VMs.
With this as preamble, let’s put nEMU to work. First, install the necessary tools. This guide assumes you have already installed Flox. If you haven’t, you can easily download, install, and follow along.
Second, we need to create a new Flox environment. For simplicity’s sake, I’m going to do this in the ~/sandbox directory where most of my VMs live. Once I change into this directory, I type:
daedalus@nomos:~/sandbox$ flox init && flox install nemu qemu libvirt virt-manager && flox activateThese commands (a) initialize a Flox environment and (b) install the nemu, qemu, libvirt, and virt-viewer packages before (c) activating—i.e., launching and putting me into—a Flox subshell.
Once I'm in that subshell, I can access and use the software Flox just installed.
For what it's worth, I don’t necessarily need to install QEMU, libvirt, and virt-viewer—they’re already on my system—but it is kind of awesome that I can get up-to-date versions of these dependencies (and hundreds of thousands of others!) from the Flox Catalog, right? This stuff just works, and I don't have to worry about it conflicting with system-wide dependencies.
It takes a moment or so for Flox to download packages and build my environment. When it’s finished I see the following:
✅ 'nemu' installed to environment 'sandbox'
✅ 'qemu' installed to environment 'sandbox'
✅ 'libvirt' installed to environment 'sandbox'
✅ 'virt-viewer' installed to environment 'sandbox'
Now I’m ready to start playin—er, using nEMU.
Configuring the nEMU TUI for QEMU
Running nEMU for the first time triggers a setup wizard that prompts me to generate a default nemu.cfg file and define a default directory for my VMs. It also prompts me to configure other defaults (paths for the QEMU, VNC, and remote-viewer binaries) nEMU uses to run, manage, and connect to VMs.
Note: If you opt to install the Flox Catalog's versions of the qemu and virt-viewer packages, be sure to enter $FLOX_ENV as the default path for both binaries when prompted by the nemu.cfg creation wizard.
By the way, one neat thing of note is that Flox Catalog gives me a much newer version of the qemu package than the one I got from the Ubuntu 22.04 repos: namely, version 9.1.1 for Flox Catalog versus version 6.2.0 for Ubuntu 22.04. The Flox Catalog’s remote-viewer package is much newer, too (11.0 in Flox Catalog, versus 7.0 in Ubuntu 22.04.). Flox makes it easy to get up-to-date versions of both!
Importing existing QEMU VMs into nEMU
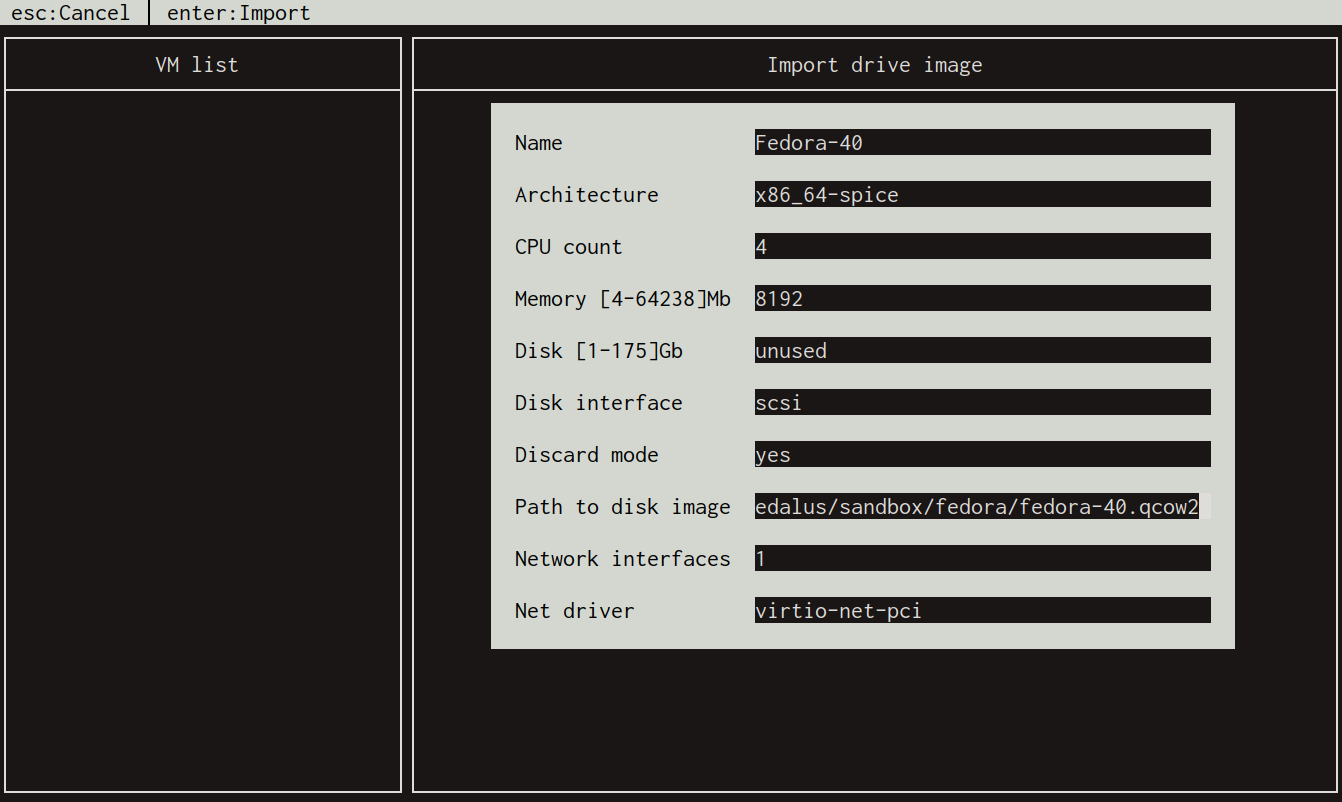
You can import an existing VM using nEMU’s import wizard, which you invoke by pressing SHIFT + A.
From there, you just have to enter some basic information about your VM and press ENTER.
Once I’ve imported my Fedora VM, I can press the e key to edit it.
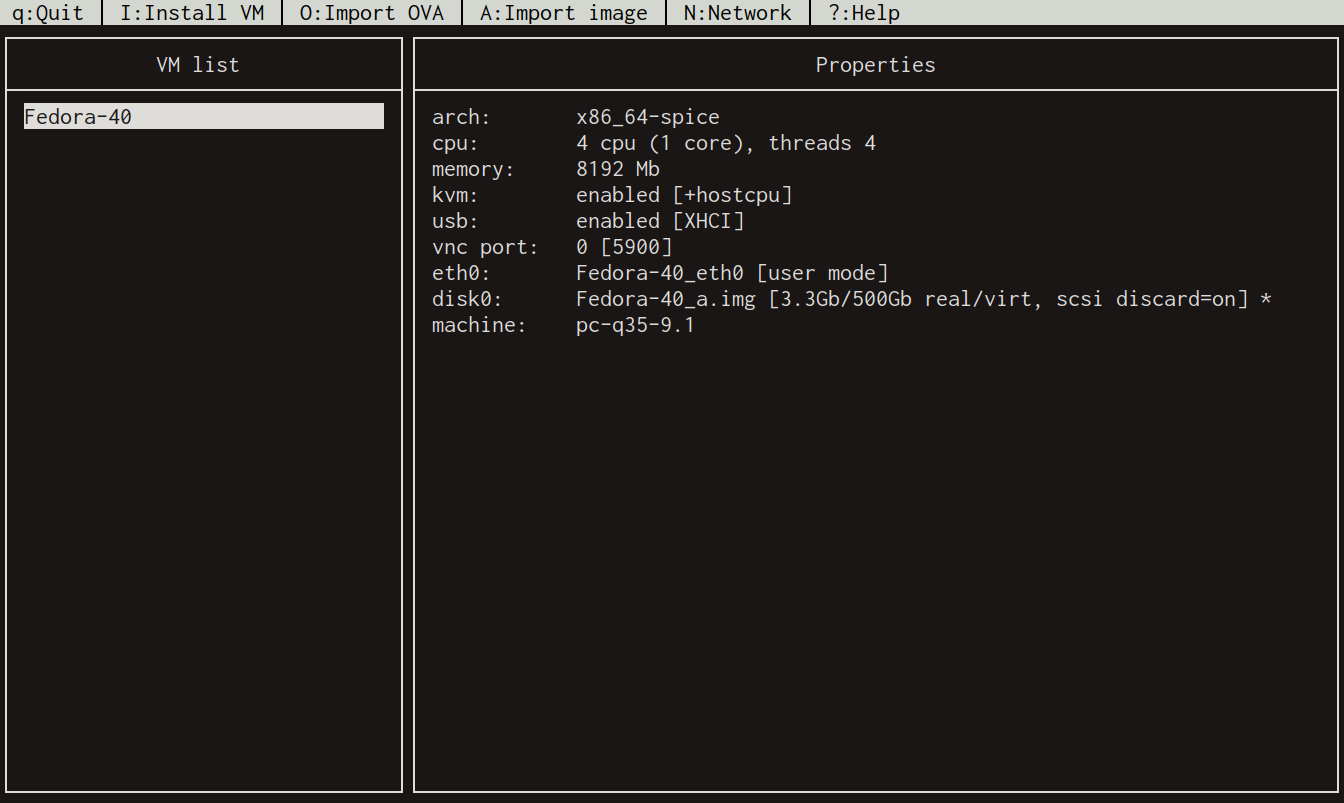
You can make many other changes, too, as well as perform actions on stopped or running VMs.
iedits network settings, including port forwarding rulesbedits boot settings;astarts a wizard to add a virtual disk;yrenames a VMlclones a VM;SHIFT + Stakes a snapshot;SHIFT + Xreverts a snapshot;SHIFT + Ddeletes a snapshot;SHIFT + Cedits viewer settings.
Running the VM is as simple as highlighting it in the left pane of nEMU's TUI and pressing the r key, while pressing p powers it down and pressing z resets it. You can highlight any VM and press the c key to connect to it.
And, oh yes, pressing the h key brings up a help menu displaying a complete list of commands.
Creating a New VM in the terminal
Creating a greenfield VM is easier than importing an existing one, because you don’t have to worry about getting the initial settings just right. (For example, an existing VM might be configured to use a specific machine type and virtual hardware configuration.)
First press SHIFT + I to bring up nEMU’s “Install VM” wizard. This screen looks a lot like the “Import” wizard above. In the screenshot below, I’ve configured an OpenSUSE Leap VM to boot using an ISO image.
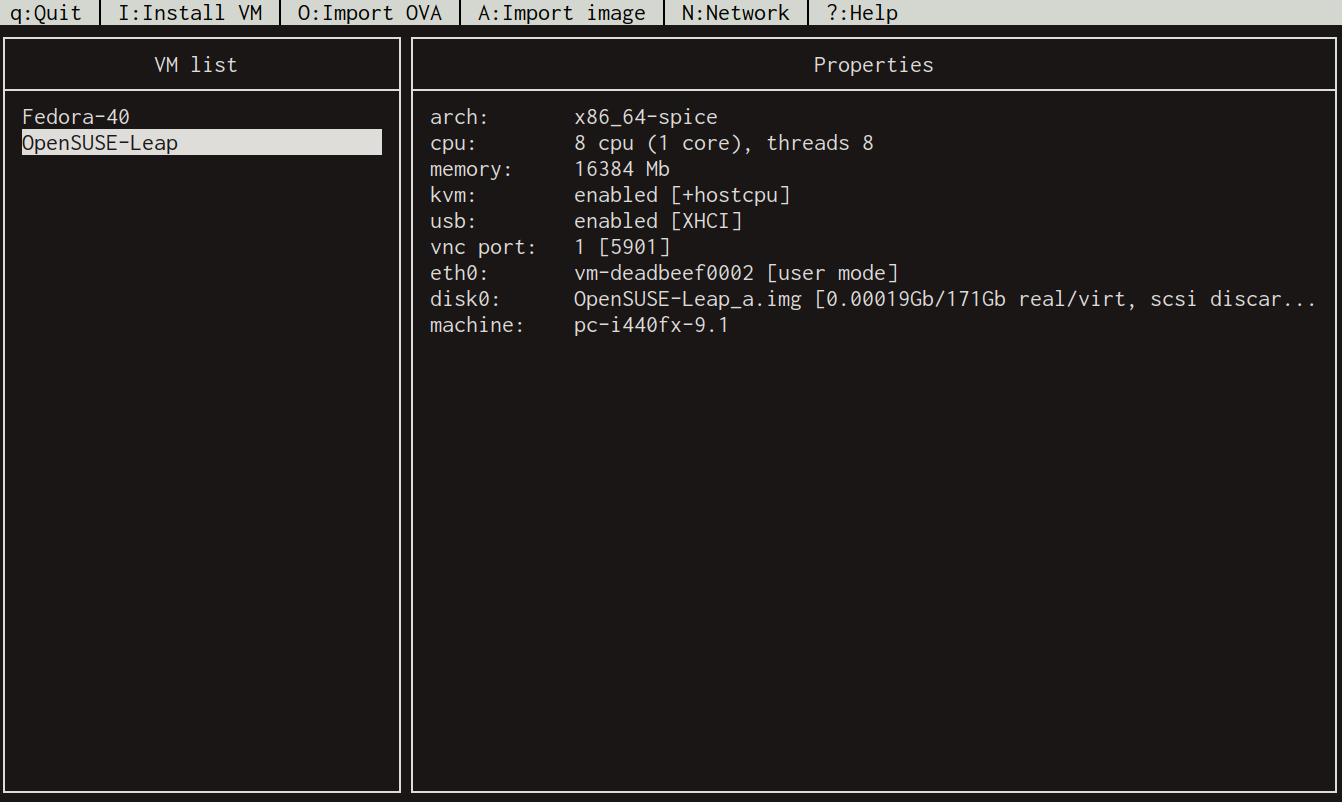
I still need to edit (by pressing e) this VM to change the machine type to q35; modify the viewer settings (by pressing SHIFT+C) to use a custom SPICE port; and configure port forwarding for SSH (by pressing i). But this workflow is orders of magnitude easier than mocking up and debugging a bash startup script from scratch!
So that’s nEMU. It probably isn’t going to revolutionize what you do with QEMU, but if you’re accustomed to working in a terminal and logging into remote systems to create, run, and manage VMs, its TUI can make things much easier. By exploring the options surfaced via its VM, boot, and network configuration wizards, you can pretty much do everything with nEMU that you can do with custom bash startup scripts.
FAQs about nEMU, QEMU and Flox
What is nEMU and how does it relate to QEMU?
nEMU is a terminal user interface (TUI) based on ncurses that serves as a frontend for QEMU. While QEMU provides extensive virtualization capabilities, its command-line interface can be complex and difficult to memorize. nEMU bridges this gap by offering a text-based menu system that allows users to create, configure, and manage virtual machines directly within the terminal without needing a graphical desktop environment.
How does using Flox simplify the installation of nEMU?
Flox allows you to install nEMU and its dependencies, such as QEMU and libvirt, into a dedicated, isolated environment without affecting your system-wide packages. By initializing a Flox environment and installing these tools, you ensure access to up-to-date versions of the software that work seamlessly together. Avoid the dependency conflicts often found when using standard system repositories on Linux or macOS.
Can I manage VM snapshots and clones using nEMU?
Yes, nEMU provides built-in shortcuts and wizards to handle advanced virtual machine management tasks like cloning VMs and managing snapshots. The interface allows users to easily take, revert, or delete snapshots, as well as duplicate existing virtual machines.
Is nEMU a suitable replacement for graphical VM managers?
nEMU is an excellent alternative to graphical virtual machine managers for users who prefer working in a terminal or need to manage VMs on headless servers where no GUI is available. It supports essential functions like creating virtual disks, configuring port forwarding, and editing boot settings through a text-based interface.
###What operating systems support nEMU?
nEMU is compatible with Linux and macOS, allowing developers to manage virtual machines across different Unix-like platforms. When installed through a portable environment manager like Flox, users can run the tool consistently across these operating systems. This helps leverage the underlying power of the hypervisor to emulate various machine types and architectures directly from their command line.