


Run Kubernetes Clusters Locally on Your Laptop with kind and Flox
TL;DR
- Kind runs Kubernetes clusters locally in Docker.
- Flox simplifies environment setup and package installs.
- YAML config defines cluster name, version, and nodes.
- Flox automates cluster creation and management tasks.
This guide shows you how to use kind, or Kubernetes in Docker, which is just what it says: a tool for running Kubernetes (k8s) clusters locally using containers, nominally for developing and/or testing software.
Read on to discover how kind can fit into (and possibly improve) your workflow!
The case for emulating a production environment on your laptop
Kind is a lifesaver if or when you need to emulate a production Kubernetes environment on your laptop.
OK, why would you want or need to do this? Probably because you’re responsible for building and maintaining Kubernetes apps or services, and you need a pattern for developing and testing them locally. Also, friends tell me many orgs use kind in their CI pipelines (in addition to local use) to validate Kubernetes manifests, troubleshoot problem deployments, or experiment with new k8s features. Kind lets you do this by running the Kubernetes control plane and worker nodes as OCI containers in Docker or Podman.
(FYI: We explored using kind in place of lightweight solutions like k3s or microk8s in an article published last year.)
That’s kind in a nutshell. Now let’s explore how to get and use it.
Install Flox and locate the kind package
First, we need to make sure we’ve got Flox installed.
Next, we’ll create a Flox project directory, just like we’d create one for a local GitHub repo:
mkdir kindOnce we cd into this directory, we can initialize our Flox environment (flox init) and install required dependencies from Flox Catalog. In addition to the kind package, we’ll probably want to grab a few supporting packages—like kubectl and maybe even k9s:
flox install kind kubectl k9s && flox activate
✅ 'kind' installed to environment 'kind'
✅ 'kubectl' installed to environment 'kind'
✅ 'k9s' installed to environment 'kind'
✅ You are now using the environment 'kind'.
To stop using this environment, type 'exit'
Having activated our environment, we’re ready to use it. So let’s do that.
Create the configuration and name the K8s cluster
To run kind, you first need to create the configuration file (a YAML artifact) you’ll use to define your K8s cluster. Then you’ll invoke the kind command to deploy your cluster. A sample kind.yaml might look like this:
kind: Cluster
apiVersion: kind.x-k8s.io/v1alpha4
name: gutes-zeug
nodes:
  - role: control-plane
    image: kindest/node:v1.32.0
  - role: worker
    image: kindest/node:v1.32.0
  - role: worker
    image: kindest/node:v1.32.0
  - role: worker
    image: kindest/node:v1.32.0
  - role: worker
    image: kindest/node:v1.32.0
This names the cluster (name: gutes-zeug) and tells kind to use Kubernetes v1.32.0 container images. This matches the version of kubectl that’s installed in the environment. It also creates a K8s control plane (role: control-plane) and four worker nodes (role: worker), replicating a hypothetical prod environment. Basically, now all you’ve got to do is run kind create cluster --config kind.yaml to start it. From there, you can use kubectl, helm, or other tools to deploy software on it.
Perfecting the environment
I’m going to cheat a little bit from here on out—but in a good way. It happens that I’ve prebuilt a Flox environment to automate the process of configuring and spinning up a kind cluster. Basically, I wrote some bash that asks me “Do you want to create a new kind configuration file?” and, if I say yes, prompts me to:
- Specify a cluster name (e.g., 'dev-cluster')
- Specify a Kubernetes version (e.g., 'v1.29.2' or 'latest')
- Specify the number of worker nodes (e.g., 3)
Once finished, it concludes by asking me: “Do you want to create and deploy your kind cluster?”
You can grab a persistent local version of this environment by running the following command:
flox pull --copy barstoolbluz/kindOr you can activate a temporary remote Flox environment by running:
flox activate -r barstoolbluz/kindIn both cases, Flox grabs my environment from FloxHub. But if you flox pull –copy, you’ll first want to make sure you’ve cd-ed into a new project directory, after which you’ll need to flox activate it. Alternatively, flox activate -r works anywhere. It activates my FloxHub environment and puts you into a Flox subshell. When you type exit and hit Enter, the session ends (but the local copy of the environment remains cached for next time).
(Note: my environment also has a built-in function, delete-cluster, you can invoke to stop and destroy your cluster when you’re finished. If you don’t specify a cluster name via the command line—e.g., delete-cluster foo—it will prompt you for one! It’s possible to automate starting and stopping kind clusters using Flox’s built-in service management capabilities, but it’s Friday afternoon after the holidays. You understand, right?)
My environment uses the gum package from the incredible folks at charmbracelet to power its bootstrapping wizard. Here’s an example of it in action:
daedalus@askesis:~/tests/kind$ flox activate
✅ You are now using the environment 'kind'.
To stop using this environment, type 'exit'

Specify cluster name (e.g., 'dev-cluster'): zeug
Specify Kubernetes version (e.g., 'v1.29.2' or 'latest'): latest
Specify number of worker nodes (e.g., 3): 4
Created configuration file: zeug-kind.yaml
Creating cluster "zeug" ...
 ✓ Ensuring node image (kindest/node:v1.32.0) 🖼
 ✓ Preparing nodes 📦 📦 📦 📦 📦
 ✓ Writing configuration 📜
 ✓ Starting control-plane 🕹️
 ✓ Installing CNI 🔌
 ✓ Installing StorageClass 💾
 ✓ Joining worker nodes 🚜
Set kubectl context to "kind-zeug"
You can now use your cluster with:

kubectl cluster-info --context kind-zeug

Thanks for using kind! 😊
Sure, it says it’s running, but … is it really running? Let’s find out!
docker ps
CONTAINER ID   IMAGE                  COMMAND                  CREATED         STATUS         PORTS                       NAMES
08017b54c933   kindest/node:v1.32.0   "/usr/local/bin/entr…"   7 minutes ago   Up 7 minutes                               kind-worker4
468376ba6996   kindest/node:v1.32.0   "/usr/local/bin/entr…"   7 minutes ago   Up 7 minutes                               kind-worker3
4b871fa37e20   kindest/node:v1.32.0   "/usr/local/bin/entr…"   7 minutes ago   Up 7 minutes                               kind-worker2
edaea18691b0   kindest/node:v1.32.0   "/usr/local/bin/entr…"   7 minutes ago   Up 7 minutes                               kind-worker
7768b09db00d   kindest/node:v1.32.0   "/usr/local/bin/entr…"   7 minutes ago   Up 7 minutes   127.0.0.1:45327->6443/tcp   kind-control-plane
So far, so good. Let’s see what output we get from kubectl:
kubectl get nodes
NAME                 STATUS   ROLES           AGE     VERSION
kind-control-plane   Ready    control-plane   9m2s    v1.32.0
kind-worker          Ready    <none>          8m52s   v1.32.0
kind-worker2         Ready    <none>          8m52s   v1.32.0
kind-worker3         Ready    <none>          8m52s   v1.32.0
kind-worker4         Ready    <none>          8m52s   v1.32.0
Excellent! Now let’s dig a little deeper:
kubectl get pods -n kube-system
NAME                                         READY   STATUS    RESTARTS   AGE
coredns-668d6bf9bc-fk65b                     1/1     Running   0          9m16s
coredns-668d6bf9bc-gf86f                     1/1     Running   0          9m16s
etcd-kind-control-plane                      1/1     Running   0          9m22s
kindnet-glfvf                                1/1     Running   0          9m17s
kindnet-pk9qd                                1/1     Running   0          9m14s
kindnet-rxjwc                                1/1     Running   0          9m14s
kindnet-tmhj7                                1/1     Running   0          9m14s
kindnet-tt5vw                                1/1     Running   0          9m14s
kube-apiserver-kind-control-plane            1/1     Running   0          9m22s
kube-controller-manager-kind-control-plane   1/1     Running   0          9m22s
kube-proxy-h9wwv                             1/1     Running   0          9m14s
kube-proxy-hqjlq                             1/1     Running   0          9m14s
kube-proxy-hztd4                             1/1     Running   0          9m17s
kube-proxy-nnzqj                             1/1     Running   0          9m14s
kube-proxy-tg6vr                             1/1     Running   0          9m14s
kube-scheduler-kind-control-plane            1/1     Running   0          9m22s
Everything looks as it should. I think? (I’m far from a Kubernetes expert, after all.)
If I had a Kubernetes deployment manifest, I could apply it using kubectl, or I could deploy a Helm chart using the helm package. So far as either tool knows, it's interacting with a gigantic k8s cluster.
Speaking of which, both kubectl and helm are built into my environment. If I need specific historical versions of either, they're almost certainly in the Flox catalog.
flox list
gum: gum (0.14.5)
helm: helm (0.9.0)
jq: jq (1.7.1)
k9s: k9s (0.32.7)
kind: kind (0.26.0)
kubectl: kubectl (1.32.0)
I can use kubectl for quick-and-dirty imperative deployments. And since I don’t actually have a production app or service to build and test locally, that's exactly what I'm going to do:
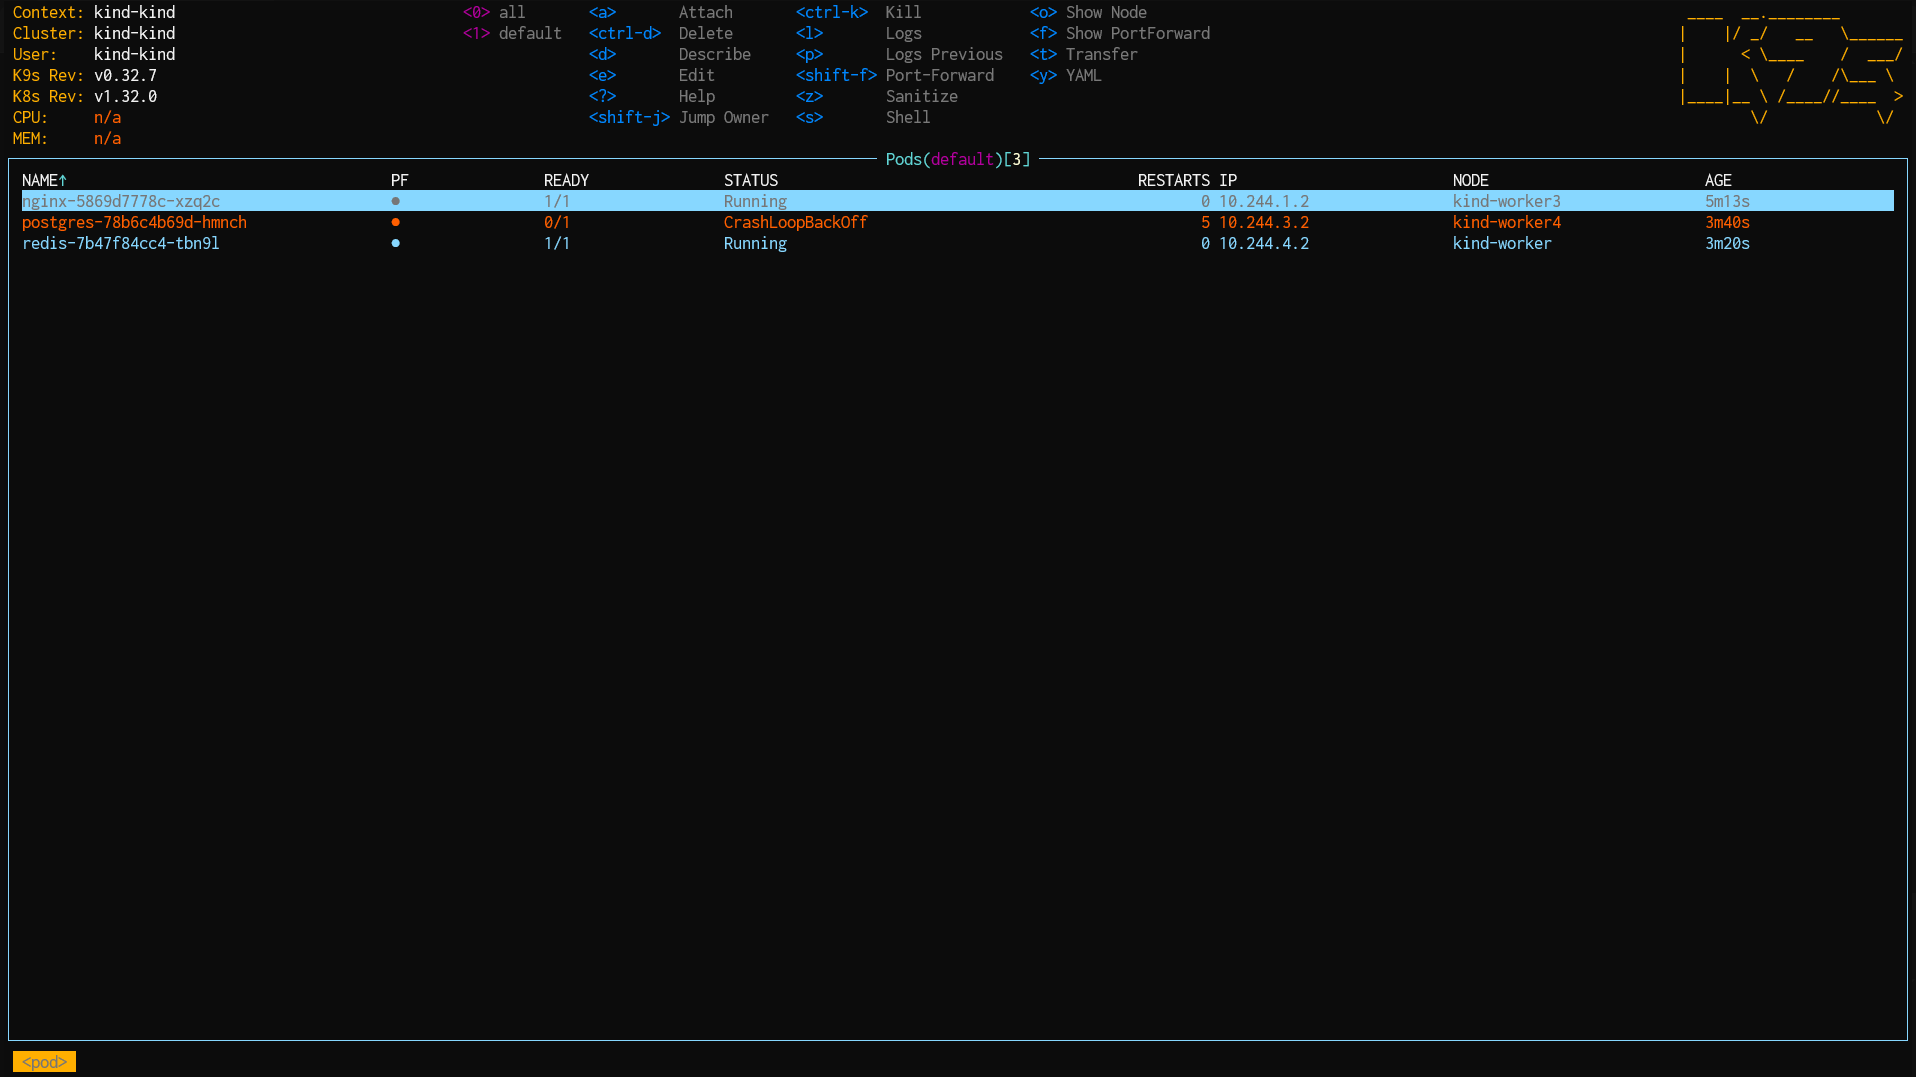
kubectl create deployment nginx --image=nginx
kubectl expose deployment nginx --type=NodePort --port=80

kubectl create deployment redis --image=redis
kubectl expose deployment redis --type=ClusterIP --port=6379

kubectl create deployment rabbitmq --image=rabbitmq
kubectl expose deployment rabbitmq --type=ClusterIP --port=5672
I’ve installed k9s in my environment, which I can use to view the status of my deployments. The screenshot below shows that nginx, redis, and rabbitmq have deployed successfully.
I’ve saved one final detail for last. If you don’t have a container runtime like Docker or Podman installed ... my environment won’t activate. Deflating-trumpet sound, right? Not so fast! You can remotely activate Flox’s Colima example environment to get an on-when-you-need-it-off-when-you-don’t container runtime:
flox activate -s -r flox/colimaColima gives you Docker in a VM, kind of like on Windows or macOS, just without the heavy-duty desktop.
Summary
So that’s kind. IYKYK: if you know, you know … kind is nothing short of miraculous.
Try experimenting with kind yourself: It’s an excellent way to learn K8s—locally, right on your laptop—without setting up a multi-node (or multi-VM) lab environment. (Trust me, I’ve been there!) And it’s becoming an increasingly popular solution for emulating a production K8s environment both locally and in CI.
Happy hacking!
FAQs about running kubernetes on a laptop
What are the main benefits of using kind for local Kubernetes development?
Kind enables developers to emulate production Kubernetes environments directly on their laptops. With kind, dev can run the control plane and worker nodes as OCI containers in Docker or Podman.
This approach offers a lightweight and fast solution for local development, testing, and troubleshooting Kubernetes applications and configurations. It's particularly useful for validating Kubernetes manifests and experimenting with new features without needing a full-blown virtual machine environment.
How does kind compare to other local Kubernetes solutions like Minikube or k3s?
Kind is the more efficient choice for CI/CD pipelines. It runs Kubernetes nodes directly as Docker containers, quickly spinning up ephemeral clusters.
Minikube typically operates a single-node Kubernetes cluster within a virtual machine. It offers broad driver support and a complete isolated VM environment. K3s, on the other hand, is a minimal Kubernetes distribution. It’s optimized for edge computing and resource-constrained systems, providing a very small footprint with a simplified installation.
What are the typical resource requirements for running a Kubernetes cluster with kind on a laptop?
While kind is designed to be lightweight, the actual resource consumption depends on the size of the cluster and the applications deployed.
A basic kind cluster with a few nodes generally requires at least 8GB of RAM and a modern multi-core CPU for smooth operation on a laptop. For more complex setups involving numerous worker nodes or resource-intensive applications, 16GB of RAM or more is recommended to maintain optimal performance.
Can I customize the kind cluster configuration beyond a single control plane and worker nodes?
Yes, kind clusters are extensively customizable through a YAML configuration file, allowing for diverse setups beyond the basic configuration. Users can define multi-control plane nodes for high availability, specify particular Kubernetes versions for each node, integrate additional volume mounts, and configure advanced networking options. Flox environments can automate these customizations, providing a streamlined way to set up complex kind clusters with pre-configured settings.