

Run LLMs Locally with Ollama + Flox
Ollama is easily one of the coolest new tools to debut in the last half-decade.
It trivializes the process of installing and running different kinds of large language models (LLM) on your local system. In the same way, it makes it easy to run models in production, too.
Just 16 short months ago, this seemed like a pipedream. Today, however, it is so much closer to reality than anyone would have thought possible.
It’s kinda amazing.
A Different Kind of Dependency Hell
There’s a catch, of course. When you use Ollama as part of a distributed software project, things can get complicated. The issue has to do with dependencies—not solely on software, but on hardware. Specifically, GPU hardware.
If GPU acceleration is available, you absolutely want your Ollama app to take advantage of it.
To its credit, out-of-the-box Ollama does a great job with this: if you’ve got a GPU, and if (mainly a concern on Linux systems) you’ve got the appropriate libraries installed, Ollama will detect and use them.
But what if you’re using Ollama as part of a collaborative project? Say you’ve built an Ollama-based app on your M2 Mac system. How do you share this with colleagues who prefer to use x86 systems running Linux?
Can you create a single reproducible environment that runs and behaves the same way across operating system platforms and machine architectures?
The Challenges of Containerizing Ollama
For most teams, the solution to this problem is obvious: containerize it!
But containerizing Ollama is fraught with problems. First, where does the Ollama service put the models it downloads? Answer: on an external volume which the container mounts at runtime. But where does this external volume live? This is a non-trivial question when dealing with large (~100GB) models!
GPU Accelerated Ollama Across Architectures
Next, containerize Ollama for which platform—Apple’s ARM-based silicon or x86-64? To run accelerated, containers built for Apple Silicon must be configured to use Apple’s Metal API, while x86-64 containers generally use NVIDIA’s CUDA API. Accelerating Ollama in both scenarios means building and maintaining separate images for each architecture. At a minimum, this involves building in all required Metal API and CUDA dependencies, defining the necessary environment variables, and configuring networking so you can access and use your containerized Ollama services. More than likely, you will also need to rebuild and retest your images when Apple or Nvidia release updated Metal and CUDA software—or tweak their APIs.
But is not-containerizing even an option? Yes, it is! This walk-through explores Flox as a better way to share development environments, one that avoids many of the pitfalls with containers.
Before we explore how this works, let’s look at how Ollama installs and runs on Linux and macOS.
Why not use the standard Ollama installer?
If you download the Ollama application bundle for macOS, or follow the official installation instructions on Linux platforms, Ollama installs to /usr/local/bin and configures itself to run as a service.
On Linux platforms, the installer needs superuser privileges to (a) determine if CUDA is available and (b) install GPU-specific dependencies. It also uses these privileges to install itself as a systemd service that starts when the system itself starts—listening on the localhost interface.
So even when you aren’t using Ollama, it’s still running. This is great for the heavy user who wants to fire up their terminal or IDE and start Ollama-ing, but if you’re just using Ollama as one of several components in a larger project … you might not want this.
On macOS, the Ollama service starts when the person who installed it logs in, and likewise listens on the localhost interface. Because it starts automatically, you have to manually kill it to stop it. This, too, isn't quite ideal.
But what if—instead of installing Ollama globally—you could have a self-contained Ollama environment that was like a container, but not? Your Ollama environment wouldn’t require superuser privileges to run. Ollama’s service would only run when you wanted it to, would automatically take advantage of available GPU acceleration, would expose a service for API-based access, and would terminate when you exited your environment.
Best of all, your Ollama environment would also be reproducible. You’d have a single, self-contained, GPU-accelerated Ollama environment that could easily be reused everywhere and by anyone. Wouldn’t this be ideal?
You’ve just described Flox’s reason for being.
Reproducible Ollama Environments, Made Simple
My question about sharing an Ollama environment across machine architectures wasn’t rhetorical.
This walk-through’s origin story begins with that problem. Flox’s Ross Turk created an Ollama environment on his M2 Mac and wanted to share it with the rest of us. But some Flox Folx (like yours truly) use platforms other than macOS, including sundry flavors of Linux.
Could Ross use Flox to create a reproducible Ollama environment capable of running with GPU acceleration across dissimilar ARM and x86-64 machine architectures? The answer to that question—spoiler alert—is yes! With Flox, he built a shareable, reproducible Ollama environment that:
- Doesn’t require you to use
sudoto set it up; - Doesn’t install itself as an always-on service;
- Doesn’t automatically listen on a default port on your system’s localhost IP; and
- Doesn’t keep running when you’re no longer using it.
Installing Flox is pretty straightforward: grab the package for your platform from the download page.
Linux packages are available in .deb and .rpm format and there's a graphical installer for macOS.
At a high level, Flox stores every single artifact (package) that it installs in a build cache. This cache is located at /nix/store because, under the covers, the Nix package manager powers parts of Flox. Each artifact is identified by a hash that uniquely identifies it. Flox environments are assembled from individual artifacts in the build cache using symbolic links.
One way to think of this is that environments are "views" into the build cache. Flox environments keep a record of the hashes corresponding to each of the artifacts installed into them, making it all but impossible to accidentally obtain the wrong piece of software for your environment.
An awesome benefit of this is that when you install a Flox package for one environment, other environments that install the same package can reuse its artifacts; this amounts to just adding symbolic links somewhere on the filesystem. Conversely, if you need to install the same package in multiple containers, you would have to rebuild each one, which in addition to increasing bloat is time-consuming, too.
Running Ollama Locally: Getting Started
Using Flox is simple. For this walk-through, we’ll first create a folder called flox-ollama, then we’ll descend into it and tell Flox that we want to create an environment in it:
mkdir flox-ollama
cd flox-ollama
flox init
Next, we want to install the ollama package from the Flox Catalog using flox install:
flox install ollamaAnd if you didn’t know the exact name of Flox’s Ollama package, you could just type flox search ollama and Flox will return the first 10 or so packages containing ollama.
Activating Your Flox Environment
Activating a Flox environment is kind of like activating a virtual environment in Python. If you’re in the same folder in which you used flox init to create your project, just type flox activate. If you’re anywhere else, you can type flox activate -d path/to/your/folder. Since we're still in the same folder, we don't need -d...:

When you’re in a Flox environment, you see flox [name of the active Flox environment(s)] prepended to your prompt in indigo. You could run Ollama in your Flox environment by typing ollama serve, but if you do that, the Ollama service will take over the console. This is okay if you just need to access the API, but if you want to interactively prompt the LLM, you need to do something different.
Running ollama serve & returns control to the console, but also prints the Ollama service’s output messages, interleaving them with any commands you enter into the console, along with their outputs. This behavior also continues when you run your model—e.g., ollama run mixtral:latest—which gets confusing quickly.
A more elegant solution is to install a terminal multiplexer like tmux into your Flox environment.
Ollama in Action
Let’s walk through how to do that.
You can easily add packages to a Flox environment via the flox install command: e.g., flox install tmux.
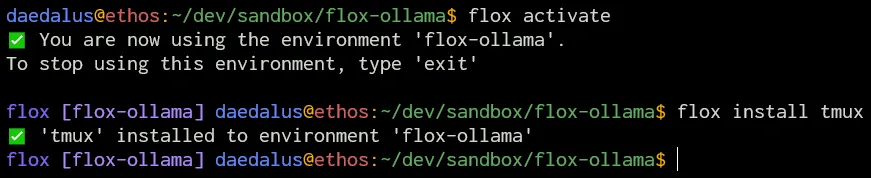
With tmux now installed, below, I’ve launched it, created a vertical split-pane view by typing Control-B followed by ", and started the Ollama service in the top pane. (Note: I have found some situations require me to re-activate the Flox environment inside a new pane-especially when I have a complex set of dotfiles.) Then I switched to the bottom pane by typing Control-B followed by o, and fired up my LLM:
![ollama serve in the top pane, Mixtral with interactive prompt in the bottom. Note: this is actually tmux in [byobu] (https://www.byobu.org/).](/images/blog/ollama-serve.webp "`ollama serve` in the top pane, Mixtral with interactive prompt in the bottom. Note: this is actually tmux in byobu.")
If I already have tmux available globally on my system, I could run that version, too, without installing tmux into my Flox environment; it just won’t be made available in that environment if I were to share it with anyone else.
Now I can prompt my model interactively, using the console:

Or I can prompt it programmatically, via the API, using a custom python script I mocked up:

Setting It up … and Tearing It Down
Oh—one more thing. I started the Ollama service from within my Ollama environment...but exiting that environment doesn't terminate the service: Ollama is still running—and listening on its default port.
One option is to manually kill it from the command line, but we can do better than that. This scenario is exactly what the hooks inside Flox’s manifest.toml file are created for.
This file lives in the env subfolder nested in the .flox folder inside the project (eg flox-ollama) directory. Flox’s Ross Turk does a great job explaining what this file is and how it works.
To complement this walk-through, we created an example Ollama environment on FloxHub, flox/ollama.
The manifest.toml file for this environment automatically runs Ollama in the background using Overmind, allowing you to move directly to pulling, running, and prompting models. Editing this file using flox edit we can see a nollama function, which kills the Ollama service.
To activate this FloxHub environment on your system, use the flox activate command and pass it the reference of the FloxHub environment. This consists of an owner (flox) and an environment name (ollamamux). The full command would be:
flox activate -r flox/ollamaRunning this command will cause you to enter this environment, skipping past all of the flox init and flox install stuff we did before.
When you’re building your own environments, you could also use shell features, like trap commands, to kill Ollama automatically when you exit your Flox environment.

Some Housekeeping Notes
A few things to keep track of: I’d already used the Ollama installer to download this version of Mixtral on my system. The Flox Ollama package was able to reuse it because, like vanilla Ollama, it stores models in ~/.ollama.
Even though Flox installs Ollama itself (the package and its dependencies), it doesn’t manage your Ollama models, and it doesn’t change where Ollama puts these models. Keep this in mind. Ollama is so much fun to experiment with that it’s easy for this folder to start out looking like this:

And quickly balloon in size to this:

What gives?
When you add packages to a Flox environment using flox install, Flox itself manages these packages.
However, if you use tools like pip, cargo, or npm to install packages from within your Flox environment, Flox doesn’t manage those. It’s kind of like when you install packages in a running instance of a container: they don’t persist as part of your reproducible environment. (Rather, they vanish as soon as the container is destroyed.) Your Floxified Ollama environment is still shareable and reproducible, but the people you share it with will still have to download their own models.
Admit It, You’re Intrigued
With Flox’s declarative model, you can pin Ollama and all of its dependencies, so the same Ollama environment always reproduces bit-for-bit on any machine. Typing flox activate and running the Flox environment gives you exactly the same CLI, tooling, and integration points—today or 12 months from now.
To share and run that Ollama environment anywhere, use FloxHub: you can sign up at https://hub.flox.dev. Teammates can easily pull and run the shared Ollama environment—even on demand—by remotely activating it with: flox activate -r flox/ollama.
FloxHub makes it easy to publish, version, audit, and remotely run Ollama environments, as well as control who uses them. You can even switch or roll back between generations—all in one place.
FAQs About Running Ollama Locally With Flox
How does Flox ensure reproducible Ollama environments across different systems?
Flox addresses complex dependency management, particularly for GPU hardware, by creating isolated, self-contained environments. This capability allows Ollama applications to run consistently across diverse operating systems and machine architectures, like ARM-based Macs and x86-64 Linux systems, ensuring predictable behavior and easier collaboration within development teams.
What advantages does using Flox offer over traditional containerization for Ollama?
Traditional containerization of Ollama is awkward on macOS: containers don’t run directly on macOS, they run inside a Linux VM (usually an aarch64 Linux guest on Apple Silicon). That adds an extra virtualization layer on top of large model volumes and makes GPU acceleration harder, since the Linux guest can’t use Apple’s Metal API directly. You also end up needing separate, platform-specific images to support different GPU backends (Metal on macOS vs. CUDA on Linux).
Flox sidesteps this by creating a unified, reproducible environment on the host OS itself. Ollama runs natively on macOS and can still use Metal, but the dependencies are managed declaratively in Flox. The same environment definition can target Linux without maintaining multiple container images, which makes sharing and deployment much simpler than juggling VM-backed containers and per-platform builds.
How does Flox simplify running Ollama without constant background processes or superuser privileges?
Flox significantly improves the user experience compared to the standard Ollama installer by eliminating the need for superuser privileges during setup. An Ollama service within a Flox environment only activates when needed and terminates automatically when the environment is exited, offering precise control and a less intrusive presence on the host system.