Skip to content

Flox + CUDA tutorial

Flox is a next-generation, language-agnostic package and environment manager.

With Flox you get reproducible collections of tools, environment variables, services, and setup scripts in the form of carefully configured subshells. There's no container isolation preventing you from using your favorite shell, painstakingly crafted dotfiles, or favorite utilities. Since Flox "environments" are reproducible, you get the same exact setup no matter where you use it, whether that's local development, in CI, bundled into a container, or deployed as a service on a virtual machine. With Flox, "works on my machine" problems are a thing of the past.

Flox is officially licensed to distribute NVIDIA's CUDA Toolkit, which provides libraries for fully utilizing the computational power of NVIDIA GPUs for a variety of workloads, including AI, scientific research, and other enterprise applications.

Figuring out the compatibility matrix between an upstream package that depends on CUDA, the CUDA Toolkit itself, and any other dependencies required for the package can be a big time investment. Flox makes that process easier by only requiring you to do the work once. Once the environment is built, anyone on Linux or Windows Subsystem for Linux gets exactly the same set of tools and dependencies. If that wasn’t cool enough, with Flox each project can have a different CUDA Toolkit installed with causing version conflicts. Each project’s dependencies are completely independent of one another.

For a quick overview of Flox, see Flox in 5 Minutes. Otherwise, let's see how easy it is to install and use the CUDA Toolkit with Flox.

Official CUDA examples

The flox/cuda-samples repository is a fork of the NVIDIA/cuda-samples repository, and contains a variety of small projects demonstrating different aspects and capabilities of the CUDA Toolkit. We've added a Flox environment on the flox-env branch that contains the dependencies for all examples in this repository. If you already have Flox installed, getting up and running is very easy:

git clone https://github.com/flox/cuda-samples.git
cd cuda-samples
git checkout flox-env
flox activate

This may take some time because the download is quite large (~9GB), but that's because the full CUDA Toolkit is quite large and the examples in this repository demonstrate many of its capabilities. The upside is that the CUDA Toolkit in the Flox Catalog is broken into components, so for your applications you can install the minimal subset that you need and download much less. For example, to install the latest nvcc you would run flox install flox-cuda/cudaPackages.cuda_nvcc.

Furthermore, since each Flox environment is scoped to a particular directory, you can have projects in different directories on your system that use and install completely different versions of the CUDA Toolkit with no problems at all.

Let's pick one of the examples and build it.

HSOpticalFlow example

Navigate to the Samples/5_Domain_Specific/HSOpticalFlow directory. This example runs headless in your terminal, but don't worry, we'll get to some nice visuals in a moment.

First let’s build the example (note that make -j8 builds the example with 8 jobs, but you may want more or less depending on how many CPU cores are available on your machine):

mkdir build && cd build && cmake .. && make -j8

Now let’s run the program:

$ ./HSOpticalFlow
HSOpticalFlow Starting...

GPU Device 0: "Ada" with compute capability 8.9

Loading "frame10.ppm" ...
Loading "frame11.ppm" ...
Computing optical flow on CPU...
Computing optical flow on GPU...
L1 error : 0.044308

And with that you've run your first CUDA-enabled project! Your output may look slightly differently, but this example should run on NVIDIA GPUs dating back to the GTX 750 released in 2014.

The Flox environment in this repository includes all of the dependencies necessary for any of the examples with a few exceptions:

  • Flox doesn't run natively on Windows (only through WSL2), so the dependencies for the native Windows examples are skipped.
  • The NvSci example is skipped because NvSci functionality is only included in NVIDIA Drive OS distributions of the CUDA Toolkit.

This means you needed and were given CMake, Make, GCC, OpenGL libraries, Vulkan libraries, etc, (and the CUDA Toolkit) without needing to figure that out on your own. Whoever prepared the environment took care of that for you.

Just git clone and flox activate and you're up and running.

If you’d like to explore some of the other examples, the mkdir build && ... command is what you'll run from inside an example directory the first time you want to build it. Feel free to play around!
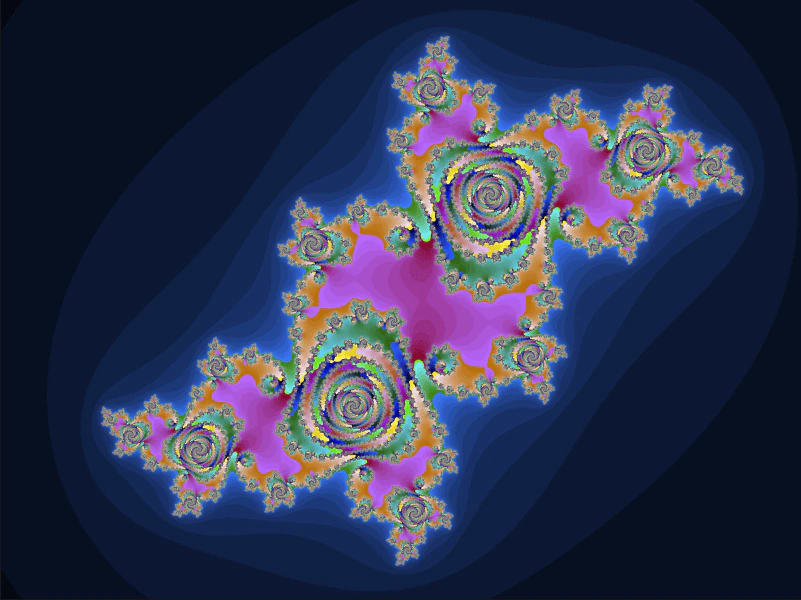
Julia set

Now we're going to generate a rendering of the Julia set. Navigate to Samples/5_Domain_Specific/Mandelbrodt then run the following commands:

mkdir build && cd build && cmake .. && make -j8
./Mandelbrodt

This will open a window with a rendering of the Mandelbrodt set, and display some instructions for tweaking the output. Press the J key to switch from the Mandelbrodt set to the Julia set, then play around with colors. Here's an example of what the output can look like after tweaking some of the parameters. julia_set.png

PyTorch

Not only can you build against the CUDA Toolkit itself, but with Flox any package that depends on CUDA can be installed with CUDA acceleration automatically enabled. To demonstrate this, we'll build and run an example from the PyTorch examples repository, and this time we'll build the environment from scratch to see how easy it is.

Clone the PyTorch repository, navigate to the mnist example, and create a Flox environment in it:

git clone <https://github.com/pytorch/examples.git> pytorch-examples
cd pytorch-examples/mnist
flox init

At this point the Flox CLI will ask to install some packages for you, but in this case we want to say no because we'll select some different packages. Normally this is helpful and saves you time installing common packages for a given language ecosystem, but in this case we’re going to install some specific packages that have CUDA acceleration automatically enabled.

In this case we'll install the following packages:

$ flox install python3 flox-cuda/python3Packages.torch flox-cuda/python3Packages.torchvision
✅ 'python3' installed to environment 'mnist'
⚠️  'torch' installed only for the following systems: x86_64-linux, aarch64-linux
⚠️  'torchvision' installed only for the following systems: x86_64-linux

Now let's activate the environment and ensure that our CUDA installation is properly detected:

$ flox activate
$ python -c "import torch; print(torch.cuda.is_available())"
True

Now we can run the example to classify handwritten digits in the MNIST database:

$ python main.py
100.0%
100.0%
100.0%
100.0%
Train Epoch: 1 [0/60000 (0%)]   Loss: 2.299823
Train Epoch: 1 [640/60000 (1%)] Loss: 1.745035
Train Epoch: 1 [1280/60000 (2%)]        Loss: 0.988044
Train Epoch: 1 [1920/60000 (3%)]        Loss: 0.612987
Train Epoch: 1 [2560/60000 (4%)]        Loss: 0.333546
Train Epoch: 1 [3200/60000 (5%)]        Loss: 0.341566
...
Train Epoch: 14 [58880/60000 (98%)]     Loss: 0.032806
Train Epoch: 14 [59520/60000 (99%)]     Loss: 0.014871

Test set: Average loss: 0.0256, Accuracy: 9919/10000 (99%)

99% accuracy, nice!

This example took a little over 1 minute to run on a machine with an NVIDIA RTX 4090.

Conclusion

As you can see, getting started with Flox and CUDA is very straightforward. Installing the CUDA Toolkit for your project is just as easy as installing any other package. On top of that, installing a particular CUDA stack is extremely easy.